PPA Tutorial - Part 3 - Using PPA in the plug-in
In this tutorial, you will extend the plug-in you created in part 2: you will use PPA to analyze a partial program and prints its abstract syntax tree to the console in Eclipse. The code that you will write will be invoked when the user clicks on the Eclipse button in the toolbar and your code will replace the hello world message dialog.
This tutorial is an introduction to PPA and to the Eclipse compiler API. At the end of this tutorial, you will know how to obtain the abstract syntax tree of a partial program and how to navigate the type information made available by PPA.
This tutorial assumes that you created a Hello World plug-in in the previous tutorial.
Configuring your plug-in
- To use PPA, you need to configure your plug-in so that it depends on the PPA plug-in and on other required Eclipse plug-ins (e.g., the Eclipse Java Compiler). Open the MANIFEST.MF file and go to the Dependencies tab.
- Click on the
Add...button and add the following dependencies:org.eclipse.jdt.core(the Eclipse Java Compiler),org.eclipse.core.resources(the API to interact with files in Eclipse), andca.mcgill.cs.swevo.ppa.ui(PPA utility classes):
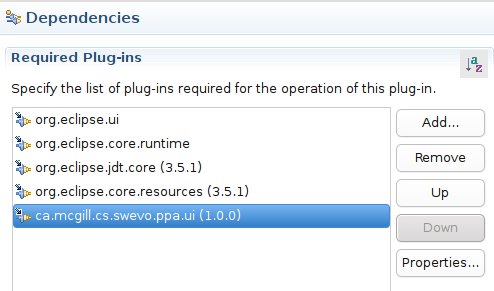
- When you write code in an Eclipse plug-in, you can only access the API of plug-ins that are in your dependencies.
- Download the partial program A.java. This tutorial assumes that the
file is saved in
/home/barthelemy/A.java
Writing the code
-
Open the
SampleAction.javasource file and change the code of the methodrun(IAction action)for the following code:
public void run(IAction action) {
    File javaFile = new File("/home/barthelemy/A.java");
    // CompilationUnit contains the AST of the partial program
    // PPAOptions is a wrapper and contains various configuration options:
    // most options are still not implemented, so the default options are
    // usually fine.
    CompilationUnit cu = PPAUtil.getCU(javaFile, new PPAOptions());
    System.out.println(cu);
}
. -
The code will not compile until you add the right imports. You can either automatically add the
required import by pressing
Ctrl+Shift+Oand selecting the appropriate imports or you can just copy the following import statements at the top of your source file:
import java.io.File; import org.eclipse.jdt.core.dom.CompilationUnit; import org.eclipse.jface.action.IAction; import org.eclipse.jface.viewers.ISelection; import org.eclipse.ui.IWorkbenchWindow; import org.eclipse.ui.IWorkbenchWindowActionDelegate; import ca.mcgill.cs.swevo.ppa.PPAOptions; import ca.mcgill.cs.swevo.ppa.ui.PPAUtil; - The code that you wrote in the run method is straightforward: it creates a file pointer to the partial program A.java, it asks PPA to generate an abstract syntax tree and then, it prints the string representation of the AST (by default, it prints the Java code, which is not terribly useful here).
- To test the code, open the console view (menu Window / Show View / Other, then General / Console).
- Then, start the Eclipse configuration you created in the previous part of this tutorial.
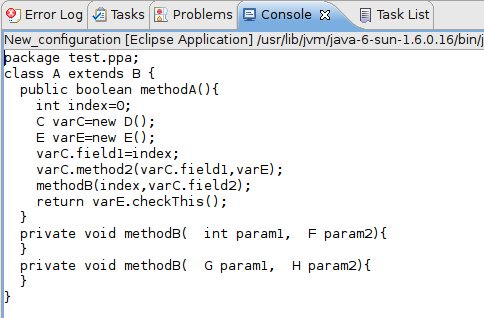
- Click on the Eclipse button. You should see in the console of the first Eclipse instance the source
file of A.java:
- Close the second Eclipse instance (the one with the Eclipse button). Now you will write the code that inspects each node of the AST and that prints the type of each node.
- Create a class
PPATypeVisitorin the packagemyfirstpluginand copy this code. -
Modify the
runmethod in the SampleAction class:
public void run(IAction action) { File javaFile = new File("/home/barthelemy/A.java"); // CompilationUnit contains the AST of the partial program // PPAOptions is a wrapper and contains various configuration options: // most options are still not implemented, so the default options are // usually fine. CompilationUnit cu = PPAUtil.getCU(javaFile, new PPAOptions()); PPATypeVisitor visitor = new PPATypeVisitor(System.out); cu.accept(visitor); } - Basicaly, you created a visitor class that will visit each node in the abstract syntax tree of the partial program. When visiting a node, the visitor first checks if the node is an expression. Then, it retrieves the type of the node, and depending on its kind (e.g., class, method, or field), the visitor prints the signature of the node.
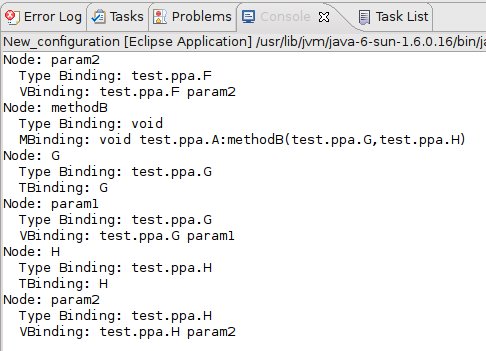
- To test the new code, just launch the Eclipse configuration and click on the Eclipse button. You
should now see in your console the type of each expression in the abstract syntax tree:
Next steps
Now you can try to explore the various methods in the PPA API or in the Eclipse
Java Compiler API. If you want to look at the source code of an Eclipse or PPA class, just
Ctrl+Click on the class and Eclipse will open the source file.
You can also try to navigate the CompilationUnit without using a visitor. Explore the API
to learn how to retrieve the declared types and traverse the statements in a method body.
In the next section, you will learn how to invoke this code from the command line without displaying the Eclipse GUI.